WOD Doc: The Overhead Squat – Putting it ALL Together
So far, Dr. Tim has broken down the Overhead Squat, a critical movement for all Crossfitters, Olympic Lifters as well as fitness enthusiasts.
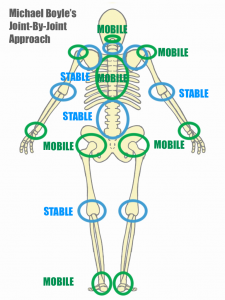
It would be remiss of me not to slap this diagram in, the Joint-By-Joint Approach, as it ties in everything you need to check before you pick up that bar.
Shoulder Stability
You can see that the shoulder needs to have mobility at the joint itself, but stability at the scapular region. Ensuring you have adequate shoulder external rotation is paramount. For review, click here and for trigger point release of the levator scapulae and trapeius, click here.
Thoracic Mobility
Here, lack of thoracic mobility will cause your torso to cave forward, putting you at risk for injury with overhead weights. The thoracic spine is the linchpin between the upper body and lower body, so make sure it’s mobile. Click here for a review of t-spine mobility.
Hip Mobility
Hips that lack mobility cause the lower back to bark, causing you pain and can also affect the thoracic and shoulder region. Keep your hips mobile so that you can get low in your squat and have the thoracic mobility necessary to keep that weight overhead. Click here for review.
Knee Mobility
Here, you may have successfully released the hip, but still notice a lack of squat depth. It can be caused by a restriction in the suprapatellar pouch, or where the quadriceps tendon inserts above the knee. Release this area and retest your squat. Click here for review.
Ankle Mobility
Finally, we come to the ankle. As mentioned above, the Joint-by-Joint Approach is complex. You may need to BEGIN at the ankle or look higher up the chain. As a general rule, you can begin with the site of pain and work out from there. Often, the site of pain has areas of influence above and / or below, so check these areas. Click here for review for ankle capsule release and here for trigger point release of the calf muscles.

